In today’s world, the quality of your photographs can make all the difference. Whether you’re a professional photographer, a social media enthusiast, or simply someone who loves capturing moments, enhancing your photos can transform them from ordinary to extraordinary. Adobe Photoshop, a powerhouse in the realm of photo editing, offers a myriad of tools and techniques to bring out the best in your images. This comprehensive guide will walk you through how to enhance a photo in photoshop, from basic adjustments to advanced editing techniques.

Why is enhancing a photo Important?
Enhancing a photo is important for several reasons, each contributing to the overall impact, quality, and effectiveness of the image. Here are some key reasons why photo enhancement is crucial:
– Enhanced photos look more vibrant, sharp, and visually appealing. This makes them more attractive to viewers, whether in personal albums, social media, or professional portfolios. In professional settings, high-quality images reflect well on a brand or individual. Enhanced photos convey professionalism and attention to detail.
– Enhancing photos allows for adjustments in exposure, contrast, and color balance, ensuring the image accurately represents the scene or subject. Photo enhancement can eliminate blemishes, unwanted objects, and imperfections, resulting in a cleaner and more polished image.
– Enhancing a photo can bring out finer details, making the image clearer and more defined. This is especially important in fields like product photography, where details matter. Techniques like dodging and burning can draw attention to the main subject, making it stand out more effectively against the background.
– Photo enhancements can be used to create specific moods or artistic effects, such as adding warmth, creating a vintage look, or emphasizing certain tones. Enhanced photos can tell a story more effectively by guiding the viewer’s eye and highlighting key elements.
– High-quality, enhanced photos are essential for printing, as they ensure the image remains sharp and clear at larger sizes. Enhanced images are often required for digital use, ensuring they meet the necessary resolution and quality standards for websites, social media, and digital marketing.
– Enhanced photos are more likely to capture attention and generate engagement on social media platforms. They can lead to more likes, shares, and comments. In marketing, high-quality visuals are crucial for capturing the audience’s interest and conveying the message effectively.
– Enhancing personal photos helps preserve precious memories in the best possible quality, ensuring they can be cherished for years to come. For historical photos, enhancement can restore and preserve important details, contributing to cultural and historical documentation.
How to Check image Resolution in Photoshop
Checking the resolution of an image in Adobe Photoshop is a straightforward process. Here’s how you can do it:
Step 1: Open the Image
– Launch Adobe Photoshop.
– Go to ‘File’ > ‘Open’ and select the image you want to check.
Step 2: Access Image Size
With the image open, go to the top menu and select ‘Image’> ‘Image Size’. This opens the Image Size dialog box.
Step 3: View Resolution Information
– In the Image Size dialog box, you’ll see various pieces of information about your image, including:
Width and Height: The dimensions of the image in pixels (or other units, if you’ve selected different ones).
Resolution: The resolution of the image, typically measured in pixels per inch (ppi) or dots per inch (dpi).
Additional Information in the Image Size Dialog Box:
– Dimensions: You can see the width and height of your image in different units like pixels, inches, centimeters, etc.
– Document Size: Shows the physical print size of the image if printed at the current resolution.
– Resample Image: If checked, allows you to change the resolution and dimensions independently. If unchecked, changing the resolution will scale the image size proportionally.
Example:
If your Image Size dialog box shows:
– Width:1920 pixels
– Height: 1080 pixels
– Resolution: 300 pixels/inch
This means your image has a resolution of 300 ppi, which is typically considered high resolution and suitable for printing.
Steps to Enhance the Resolution of the Images With Photoshop
In this section, you’ll learn how to use photoshop to enhance photos using this image enhancement tool. Follow these steps to convert your blurry, low-resolution photos into crystal-clear images:
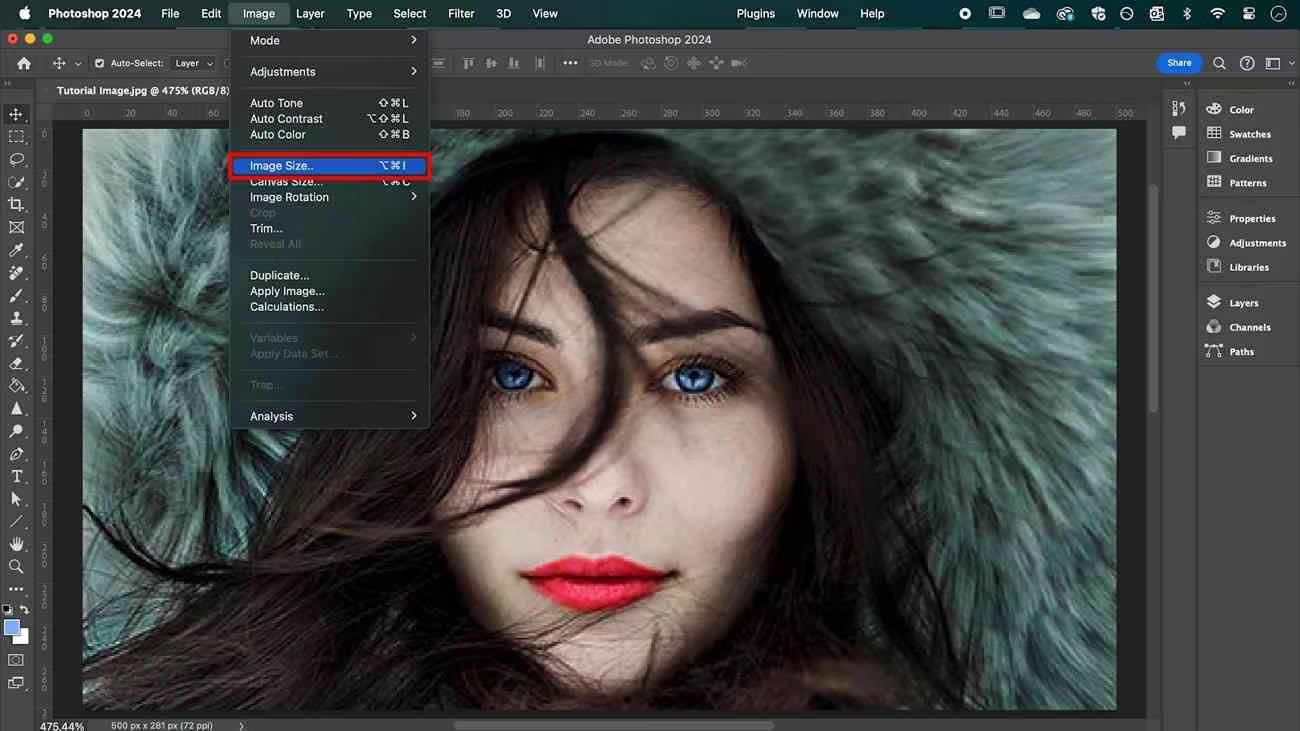
Step 1: First, open Adobe Photoshop on your desktop to increase the resolution of the desired image. Once open, add the image you want to enhance. Click the “Image” option at the top of the main editing interface screen. Go ahead and select the “Image Size” option from the drop-down menu to open a small window.

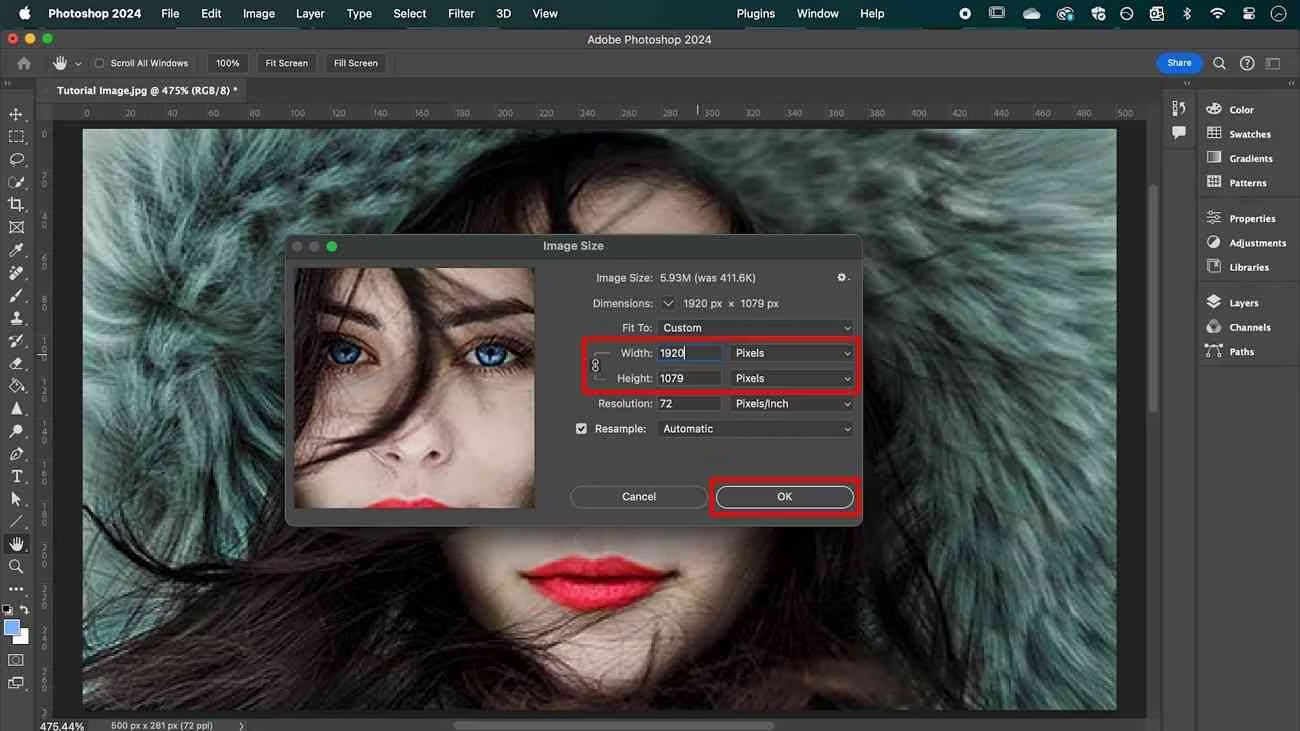
Step 2: When a small window called “Image Size” appears, you have a lot of options. Note here the width and height of the desired image in pixels. After clicking the OK button, various areas of the image appear distorted.

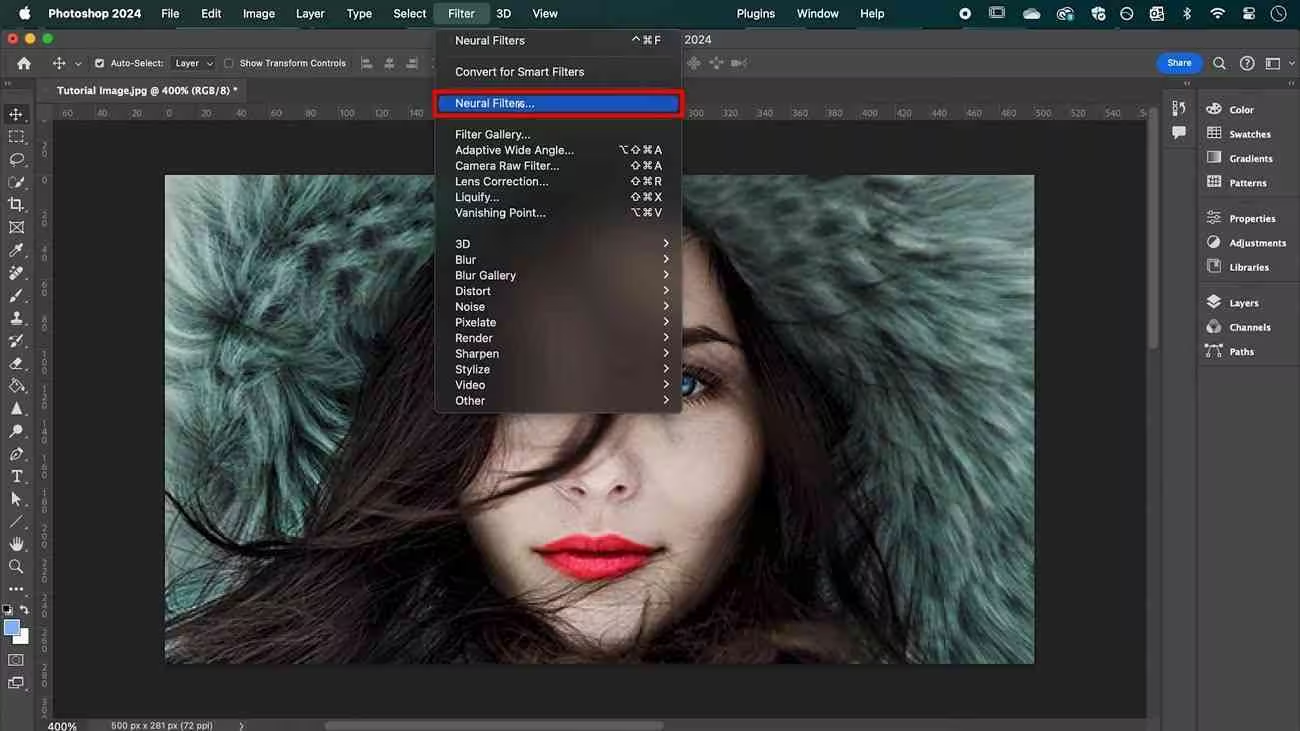
Step 3: To improve the pixelated image, press the Filter option on the top screen. In the drop-down menu you will find various additional filters such as Camera Raw Filters, Lens Corrections, and more. Here, select the Neural Filter option to open the panel on the right.

Step 4: Scroll down the options in the right-side panel and enable the “Photo Restoration” filter. Once enabled, you will have access to various photo restoration options. Use the sliders to adjust the “Enhance Face” and “Photo Enhancement” settings. Then, click the “Adjustments” drop-down menu to manage settings like noise reduction, JPEG artifact reduction, and more. After making the desired adjustments, click the “OK” button to save your settings.

Tips for increasing image resolution

- Utilize professional photo editing software like Adobe Photoshop for the best results in increasing image resolution.
- When resizing images, ensure the “Resample Image” option is enabled. This allows you to change the pixel dimensions independently of the physical size.
- Adobe Photoshop’s Super Resolution feature can significantly enhance the quality and resolution of your images. Apply this feature for improved details.
- After resizing, adjust settings like Sharpening, Noise Reduction, and Texture to refine the image quality.
- The higher the quality of the original image, the better the results after increasing the resolution. Always try to work with the best quality source images.
- Apply noise reduction techniques to minimize graininess and improve clarity in your enlarged images.
- Use levels and curves adjustments to enhance contrast and bring out more detail in your images.
- When saving your enhanced images, choose high-quality file formats like TIFF or PNG to preserve details and minimize compression artifacts.
FAQs about how to enhance a photo in photoshop
Q: How do I enhance the brightness and contrast of a photo in Photoshop?
A: To enhance brightness and contrast, go to Image > Adjustments > Brightness/Contrast and adjust the sliders. For more control, use Image > Adjustments > Levels or Curves.
Q: What is the best method to sharpen an image in Photoshop?
A: Use Filter > Sharpen > Unsharp Mask. Adjust the Amount, Radius, and Threshold sliders for optimal sharpening. For advanced users, the High Pass filter method can provide more control.
Q: What is Super Resolution, and how do I use it?
A: Super Resolution is a feature that doubles the linear resolution of an image. To use it, right-click on your image in Adobe Bridge and select Enhance. In the dialog box, check the Super Resolution option and click Enhance.
Q: Can I remove blemishes and unwanted elements from my photo?
A: Yes, use the Healing Brush Tool, Spot Healing Brush Tool, or Clone Stamp Tool to remove blemishes and unwanted elements from your photo.
Q: How do I change the resolution of an image without losing quality?
A: Go to Image > Image Size, enable Resample, and select an appropriate interpolation method such as Bicubic Smoother for enlargements. Adjust the resolution and dimensions as needed.
Straightforward Instructions to Enhance Image Resolution with Remove.pics
In this section, you will learn how to use Remove.pics to improve blurry or pixelated photos. Follow these steps to learn how to improve your images in seconds:
Step 1: Visit the website https://remove.pics/

Step 2: Choose “Enhance”

Choose “Enhance”
Step 3: Select and upload your image

Select and upload your image.
Step 4: Choose features according to your needs and let AI do the work

Choose features according to your needs and let AI do the work.
Step 5: Download images completely free in high-quality

Download images
In addition, Remove.pics also provides a number of services such as: Removing background, Removing objects, and Removing watermarks. All are free and easy to use.
In this article, we learned that there are ways to use artificial intelligence to transform blurry, stale images into enhanced images. We’ve already discussed how to enhance a photo in photoshop. However, if you face difficulties using this enhanced tool, Remove.pics is the best option. Its lightning-fast artificial intelligence scans your photos for blur and corrects them perfectly.
Readmore: Spruce Up Your Snaps: How to Add Text to a Photo iPhone
Related Posts


